

Howdy Vados!
It’s Jonathan here with another signature DR:TX Rules Ramble, leading up to our November live event EMERGENCE! This is our next ST led overarc of the season, led by Maenad Wilder. Each week, I’ll discuss in detail an aspect of the upcoming event, compiling the rules and lore into one easy place to read! This week, we are covering a side mechanic you might have noticed on Sunday mornings called The War of Antlers!
TICKETS FOR OUR NOVEMBER EVENT ARE ON SALE NOW! GET READY FOR A CREEPY CRAWLY GOOD TIME!
We are running our first ever BUNDLE deal for event tickets! If you purchase your Standard Casting tickets for both the November and December events at once, you’ll get a great discount AND access to the unique new Blueprints we will release in December. Check it out on our Tickets page! You’ll still be able to purchase a Grab Bag for the December when tickets go on sale after the EMERGENCE event!
Our Slime Promo is live! We have a new reward when you purchase the extra +2 XP for your ticket in November. If you get the additional XP, we will have a container of home-made SLIME ready for you at check-in! This slime may or may not contain bugs (don’t worry, they are fake!) and is guaranteed to be the perfect way to get into the right headspace for this event!
We have a new CAPs offer for GLOWSTICKS! Scoop up some deals during the post-Halloween sales and earn some goodies for your characters! We are offer 3x CAPs for all glowstick purchases, so all you need to do is bring your receipt or email us a copy. We prefer the chunky glowsticks versus the bracelets, but any and all glowsticks are appreciated. The colors we need most are green, purple, orange, and red.
Our photos for this post were taken from previous DR:TX events by our talented Photo Team, by Max Pohlmeier, Lauren Guzaldo, and Maddeax Khole.

This blog post concerns a mostly OPTIONAL mechanic for this season.
If this seems like something you don’t want to be a part of, or you don’t want to learn a whole new system of rules, that’s fine. Feel free to skip this blog post, but I’m not going to get into the nitty gritty of the actual rules. This is meant only as a high-level overview of the War of Antlers. If you’d like to know more about the actual rules, send us an email at info@dystopiarisingtx.com, or reach out to our in-character General in game.
Content warnings - War
The themes of Dystopia Rising often touch close to our real world in ways we cannot always avoid. The DR:TX team believes that we can still tell these stories about challenging topics, but we also believe we need to be transparent about our intentions and set proper expectations for our content. In our tradition of radical trust, we want to also trust in each player that attends our game to know their own limits and be able to choose to avoid topics and situations that make them uncomfortable.
Our season-long story of THE WAR OF ANTLERS will touch on war, conflict between nations, war crimes, violence and all the terrors and horrors that war brings. While this is all taking place mostly “off-camera” in our setting and this is simply a fantasy world we play our zombie game in, we understand that this distinction may not be always clear cut. With some recent world events in the news like the terrible violence overseas, we also understand this topic might not be for everyone right now.
With this in mind, it’s one reason we take our OK Check-In System so seriously! We understand that these may not be stories you want to participate in, and that’s okay! We encourage you to take the necessary steps for your own emotional safety. Remember, you can always use the OK Check-In System to choose to leave a scene, even CVC, and even war plots.
However given the scope of this story, this may not be a topic you can always entirely avoid at DR:TX events this season, especially if you get involved with these War of Antlers mechanics. Some elements of the war plot will bleed into the regular game, even if you choose not to participate in this specific plot. You might have refugees coming into to town asking for help, wounded from battles that need healing, or even in-game consequences that effect the play space as the war progresses.
We will strive to be mindful of our players and respect your decision to leave a scene. Don’t worry, there will still be plenty of zombies and raiders to survive later if this doesn’t spark joy.

the War of Antlers
The war between the Oxkiller Alliance and the San Saba Territories has erupted into full-scale conflict. The forces of the enemy Oxkillers have superior numbers, training, and are well supported from their new territory in the north, and will need to be opposed by the new forces of the San Saba Militia and its new General, Hargrave Moss-Iverspiit. The LCs will need to decide a battleplan, gather supplies and reinforcements for their armies, and make hard decisions with limited resources. The LCs will use dice to determine the outcome of battles but have several ways to mitigate the randomness and improve their odds of success. The resolution of the war and the difficulties of the enemies at the end of the season will be determined by how successfully the war is prosecuted during the previous events of the season.
Theme - The Fog of War
The War of Antlers is a delicate dance of moving pieces, personalities, and a bit of luck. Drama is driven by the unexpected, and one of the major themes of the conflicts to come is the “Fog of War”. There are no satellite images or drone spies, limited long range communication, and no ways to really detect enemy troop movements or strengths without getting physical reports and intelligence gathered by people. Players will not have access to all information during each stage of the war, and will need to react to danger and actions of the enemy in real time during the event, and trust to chance to help their troops survive in the battles that follow between the games.
Theme - Small Skirmishes, Not Battalions
For the War of Antlers, the scale of the battle is much more reduced than wars of the past. In the zombie apocalypse, a powerful “army” will never be the massive force of before the fall, with forces of soldiers, artillery, support forces, troop transports, and more. There simply aren’t enough survivors left. While each individual survivor can be a powerful hero in their own right, gathering too many people in one place attracts the undead, raiders, and worse. Battles are conducted between dozens and hundreds of soldiers, not thousands. This war is prosecuted on a scale of technology similar to the Civil War, or the Revolutionary War, and involves much smaller armies than would have been found in the time before the fall. When we say “army”, just keep in mind that the scale is much smaller.
Theme - Collaborative Storytelling
The War of the Antlers relies on the players to engage with the concept and take some calculated risks. If the LCs have a cool idea for a new Combat Unit, or a neat way to earn the support of a powerful faction, we will strive to tell a better story together by saying “yes, and…”. While there is some element of RNG to the combat system below, the goal is to provide many ways to mitigate this risk and tell a story together rather than simply rolling dice and determining a number. Your decisions will matter, and your ideas are important.

rules Overview
Each month, the LCs will represent the leadership of the San Saba Militia, completing Zone of Mechanics, Work Orders, and Research in order to support the forces of the San Saba. By the end of the event they will have to make a decision of where to deploy their forces during the time between games, and make battlefield decisions during the event for conflicts that occur during the game.
The Role of the General
The General will be the primary architect of strategy and decisions during the War of Antlers, but can involve other players as much as they prefer. If the General decides to appoint a War Council, other LCs can be allowed to complete the War Report and make decisions for the Militia. LCs can risk their items, health, and Infection to lead units into Battles as Commanders, or can complete ZOMs and Challenges during the game to earn advantages for the General and the Militia. While this is very much a side plot run during Season 5, there will be other avenues for LCs to be involved in this story. Risking your character during this plot kit is an “opt in” behavior, and should be considered before you accept this challenge.
There are a few major steps the General and his allies will face during the War of Antlers that the LCs will need to resolve each event:
War Report - At the start of the game, the General will receive a War Report. This will be a new in-character form similar to a Skill Challenge and will outline the decisions they will need to make as the General of the Militia. This will outline the resources available to spend during the event in the form of War Supplies, the intelligence gathered by spies of upcoming conflicts and Battles, the available Troop Allotment and list of forces available to command in the field, and a list of Strategic Actions you can take during the event to change the outcome of the battles to come. Lastly, the General will need to decide where to commit their forces and deploy them to the Battle Plan in preparation for the final conflict.
The General will resolve this Challenge on Sunday morning at the Depot, with either Jonathan or Heather, so they will have the entire game to plan with their allies and prepare for the Battles to come.
War Table - This will be a Room Augment in the game that will serve as a place to receive field reports, learn about new Work Orders and Challenges, and will be the home of your various mechanics sheets to consult during the event. This area will have the Map Board, a visual representation of your forces in the field. This Room Augment was placed in the Depot during our October event.
War Supplies - This is a new Local Plot Card that represents a quantity of valuable supplies for your troops, like water, food, medical supplies, and ammunition. The General will receive a certain amount of these each game as the passive income of the San Saba, but you will have the opportunity to spend in-game resources and complete events to acquire more. You will never have enough supplies to do everything, so you will need to make some careful decisions about how you use these resources.
You can acquire new War Supplies through the permanent work order ZOM “Bullets & Beans”. This will allow any LC to collect items in game to construct a new War Supplies item. This will be the primary way the General can acquire additional War Supplies, and this ZOM can be found at the War Table.
You can also obtain these items from NPCs by politicking and making deals, and completing other War Supply Orders that are encountered in game by the end of the event.
These are in-game ITEM CARDS, and can be lost, traded, stolen, or destroyed, and have a value of about 50 Brass. You must have War Supplies ready to spend when asked, and if you do not have the item cards close by, you will not be able to use them.
Combat Roll - At the end of the event, you will make several rolls of a d20 to represent the success of your forces in the Battle known as a Combat Roll. This d20 roll will need to roll UNDER or EQUAL TO the Unit’s Combat Value (CV), a numerical score that determines how strong they are in the field. If a unit has a Combat Value of 10, you will need to roll a 10 or less on the d20 in order to achieve a Success. If you acquire enough Successes to complete the Battle, you will be victorious! You will roll additional dice for each Unit deployed to the Battle Plan, so bigger armies will be more likely to win a fight. You might also have an Enemy Difficulty of the fight that ADDS to your roll, making it harder to roll under your Combat Value.

The War Report
The War Report is an in-character item that is delivered at the start of the event and will have several basic decisions that the General and his allies will need to manage during the event:
Troop Upkeep - During this step, the LCs will need to reinforce their units, repair and rearm troops, and maintain the supply lines for their forces in the field. Each Unit will require an expenditure of War Supplies each event, so larger armies will require more War Supplies to maintain. You will know the amount of your basic Upkeep at the start of the event via the War Report, but will not be required to pay for the Upkeep until the final resolution on Sunday. If you fail to reserve enough War Supplies to provide needed resources to your troops it can have disastrous consequences in a Battle. Don’t overspend your resources if you can!
Troop Allotment - This will list out your available forces in the San Saba Militia, let you know the Combat Value (CV) of your troops, and let you evaluate the risk of deploying certain forces to the battlefront. Each Troop will have a number of Keywords that can change a battle in their favor if deployed wisely. The Combat Value of the troops can be increased by winning a conflict, completing a Zone of Mechanics or NPC action, upgrading the Unit with additional gear and equipment through a Strategic Action, or by spending War Supplies for the next Battle.
Strategic Actions - The General can choose a limited number of actions to influence the upcoming battles. You will have THREE (3) actions you can take each month, and you can purchase a single additional action with 10 War Supplies (for up to FOUR (4) total actions). You will be able to perform Reconnaissance on enemy troop strengths through spying and reconnaissance, Upgrade your troops with gear and new weapons, Recruit new Units into the Militia from the population of the San Saba, Resupply damaged and Routed Units that need help, or ask for War Support from your allies. You can even choose the same action more than once, but with limited total actions you’ll need to choose wisely.
NOTE: Since there will be five or more different Strategic Actions you can take each month, you will NEVER be able to do everything.
Battle Plan - The General will need to deploy his reinforcements and shift troops on the battlelines to achieve victory. However, the San Saba is vastly outnumbered by the Oxkiller Alliance forces so the General will need to be careful about overcommitting to a lost cause and pick their Battles wisely. Other LCs can even be chosen to Command a Unit in the Battle, earning a powerful bonus by risking their personal equipment, Body & Mind, and even Infection to lead the fight. You will be able to spend additional War Supplies to temporarily Bolster your forces, but this will be a one-time bonus for the next fight only. You can also gain powerful bonuses if you commit your forces early but will have less flexibility to react to situations that occur during the game.
Skirmish - During each event, the General will be required to respond in real time to conflicts happening over the weekend. This attack could occur at any time during the event, day or night, and the General will have a limited window of 1 hour to respond. If they do not act quickly or the NPC cannot find them, the Militia will be at a disadvantage on the upcoming Battles step. This is functionally a Skill Challenge that can either be passed or failed. This might require you spend War Supplies, commit one of your Units to a fight that you had planned on saving for a Battle later, make a hard decision, or win a Combat Roll. You can complete Research during the event to have a heads up about what to expect from the Skirmish.
Battles - The final step of the War will occur between events and take place “off camera”. This is an approximation of several different fights that happen over the weeks between games and will impact the challenges the General will face during the next event. There is a planned cadence of Battles, with roughly two happening between each event. You will complete the Combat Rolls for these Battles on Sunday, so you will have time during the event to plan your strategy.

The Troops of the Militia
The combat forces of the San Saba Militia were drawn from the populace of the San Saba at the order of the Board last season. Over the summer, they’ve mustered a decent force to oppose the mighty Oxkiller Alliance, but they are still heavily outnumbered. Here’s a look at the forces that were available to the Militia at the start of the October event:
The Essex Protectorate - Funded by the Widows of the Lone Star, the Essex Protectorate is the elite defenders of Essex mobilized for war.
Fallow Hope Militia - Funded by Prudence Penitentiary, the zealous forces of the Fallow Hope make up one of the stronger units within the Militia.
Reckoner Legion Gamma - Funded by the Grave Council, the Reckoners are elite psionic shocktroopers that can employ psitech against their enemies.
The Red Ledger Battalion - The strongest force within the Militia is a mercenary unit of the Red Ledger, sent to the front by Gustav Glasseyes. As long as the pay is right, they will be a valuable force to bolster the lines.
The JaCintos Defense Force - Funded by the San Saba Republic and led into battle by Colonel Sabbath JaCinto, the Defense Force is a well-trained combat core of the Militia.
Torchlight Tyrants - Funded by the San Saba Republic, the Torchlights are one of the few remaining combat forces available to the Republic, gathered from the Lascarian and Tainted clans of their house.
The Veiled - Made up of the skilled operators of the Widows of the Lone Star, this unit of scouts are experts at reconnaissance and stealthy maneuvers.
San Saba Militia Unit 101 - Fresh recruits from the San Saba Republic. Newly recruited units are especially vulnerable if they lose a fight until they gain valuable combat experience.
San Saba Militia Unit 102 - Fresh recruits from the San Saba Republic.
San Saba Militia Unit 103 - Fresh recruits from the Railroad Conglomerate.
San Saba Militia Unit 104 - Fresh recruits from the Junkerpunks.
The Diamondbacks - Funded by the Junkerpunks, the Diamondbacks are the mounted cavalry of the faction, piloting powerful DJ vehicles into combat.
Each combat unit can be deployed to a battle, and can be led into the fray by a Commander, an LC or NPC that offers a powerful advantage on the final dice roll, but can even lose their own Infection if the unit is destroyed during the battle. Talk about high risk, high reward!

Updates from the front!
Now that you understand a bit about the War of the Antlers basics, let’s cover what happened during our last event, based on the decisions of the players at the War Table and their fearless leader, General Hargrave.
At the start of the event, the Militia was presented with three different Battlefronts to defend: a Conflict at the Sweetwater Camp, an Assault on New Barogue, and the Battle of Roy’s Rest. While each fight was important to the cause, the General chose to forsake the defense of Barogue, instead deploying his entire forces to Sweetwater and Roy’s Rest.
The General used his limited Strategic Actions to scout the upcoming Skirmish and understand a bit more of the battlefields to come on Sunday. They also recruited two new combat units based on generous donations from the Road Royals and Ramguard.
A Skirmish at New Barogue occurred late at night on Saturday, as they discovered the Oxkillers were using the Barogian language to hide their orders. The General declined to answer the ambush, leaving the remaining forces at Barogue defenseless and keeping his forces fresh for the fights to come.
Due to the decision to not deploy any forces at the Assault on New Barogue, the remaining defenders of the RRC settlement in the shadow of the titan city were destroyed by the invading Oxkiller Alliance. This area is now firmly in the hands of the Oxkillers and has denied the RRC crucial resources in the months to come, and cost the Militia valuable War Supplies from their monthly income.
The Battle of Roy’s Rest was won in a total victory, thanks to a heavy deployment of forces including the Essex Protectorate, the Road Royals, the Ramguard, and the fresh recruits of Unit 101, 102, 103, and 104. Thanks to their efforts, they drove back the Oxkillers from the eastern front and protected the Clutch from an enemy advance. However, the Protectorate and Unit 104 suffered heavy casualties.
The Conflict at Sweetwater was won a minor victory, thanks to the remaining Militia forces including the JaCintos, the Reckoner Legion, the Fallow Hope Militia, and the Red Ledger mercenaries. Thanks to their efforts, valuable scrap yards were defended, enabling the Militia to deploy new Cavalry units in the months to come, including the newly recruited Road Royals. However, the JaCinto Defense Force suffered significant casualties in the fight.
There’s clearly a lot more to these rules you can learn about in game, but that’s a glimpse of what’s in store for our brave heroes in the Militia over this season, as well as what they’ve achieved so far. I’ve mentioned a few key locations here that you might not have heard of, so let’s put these locations in context to our hometown.
Let’s look about a really exciting new resource I’ve been working on, the WAR MAP!
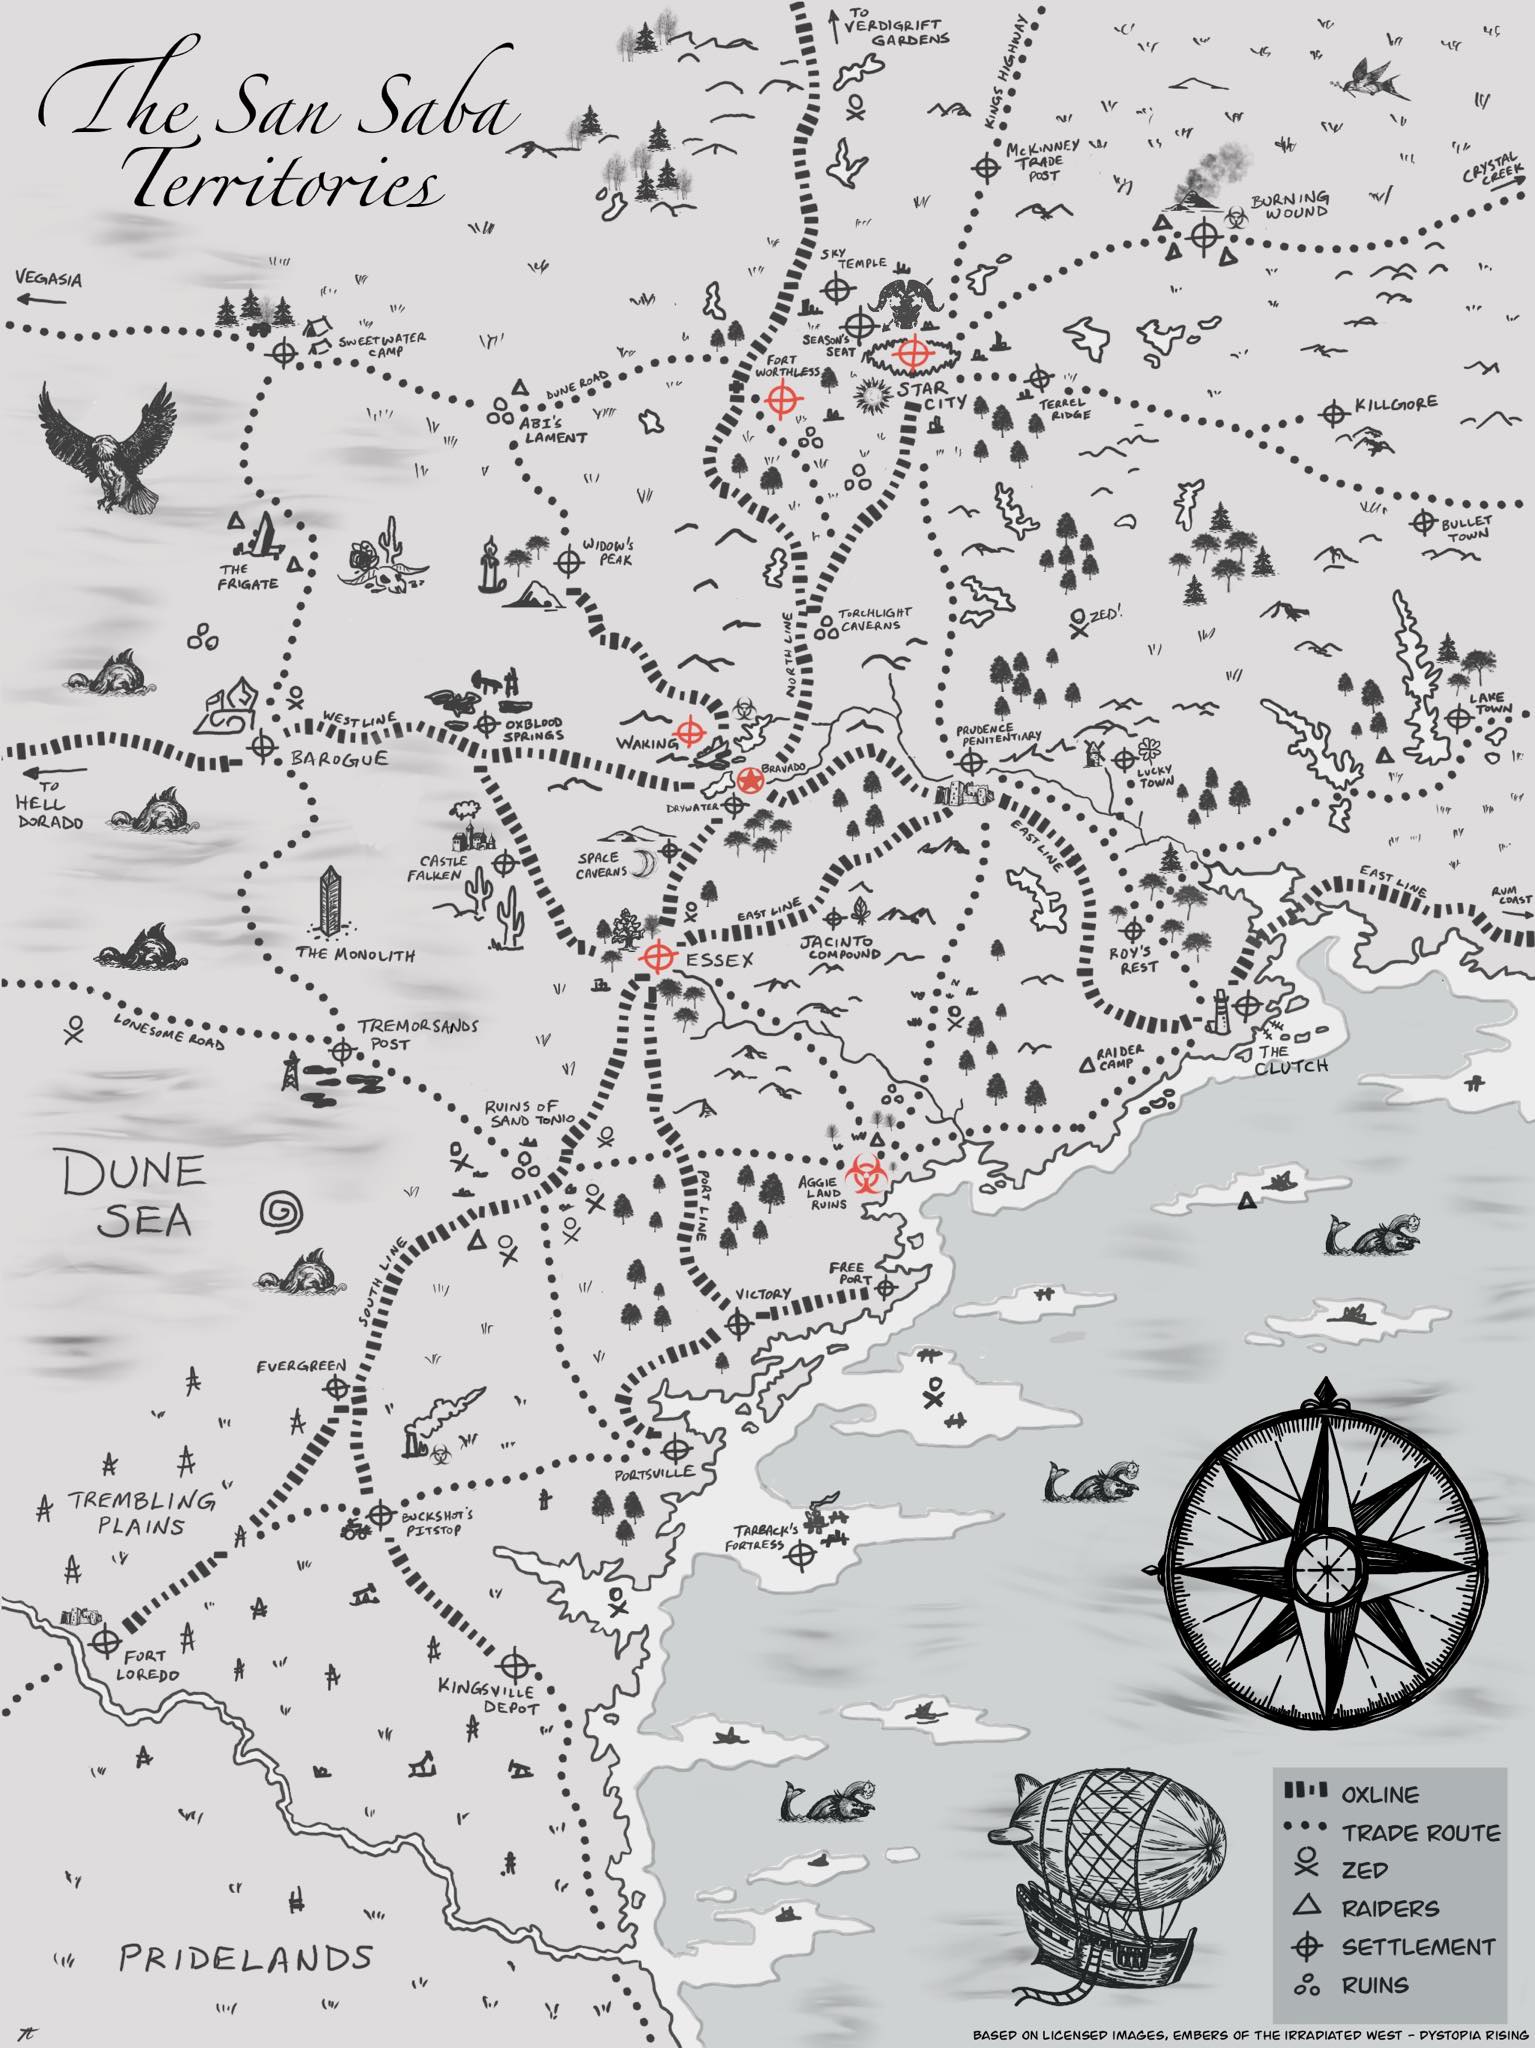
The new Map of the San Saba
You’ve probably seen a few of the maps we’ve included online before this, but those have been focused on a general overview and not a detailed breakdown of the region. Back in 2.0, a map very similar to this one was printed in the book, Embers of the Irradiated West. That book is very much worth the purchase and is still available on DriveThru RPG and has a lot of the background details that you might hear about in game. You might even see some illustrations of some old familiar Bravo faces inside!
This map above is an new and updated version of that old map, drawn by yours truly, but it is heavily inspired by the original image in the book. The same basic “Texas in the Zombie Apocalypse” layout is there, with most of the cities and locations originally described in the tabletop book still in the same basic places. I’ve tried to achieve the same basic style of the former 2.0 map, as it was part of the book I especially loved. I hope this new map helps you better understand the world of our game, and inspires countless stories to come.
I’ve updated this new map for some new locations, some changes in the setting in 3.0, with a focus on a few major locations of interest during the War of Antlers. If you don’t see a certain player-created area on this map, that’s okay! If an area is listed on the map, it could end up as a target of the Oxkiller Alliance during the war, so we haven’t included every single location that exists in the world. There are many other places out in the San Saba that are still there, safe in the story of your background submissions and character histories.

WRAP UP
We have a few weeks left until our event EMERGENCE, and we are so excited to show you the danger of our new BEHEMOTH PARASITES. Mae and our team have cooked up some great events, some neat props, and some terrifying new villains. We can’t wait to challenge you with a new disease, and help your characters tell the story of survival against all odds.
Next week, I’ll cover some Rules You Should Know, including a useful tool you’ll be able to unlock during the event called the Containment Zone. Stay tuned for more!
TICKETS ARE ON SALE UNTIL FRIDAY, BUT YOU’LL STILL BE ABLE TO PURCHASE THEM ON SITE. SAVE YOURSELF A WAIT IN LINE, AND BUY THEM TODAY!
See you soon Vados!